Friday, December 6, 2013

Realizing Animation without Flickering Using Java

Background

Years ago, during my studies, a friend of mine told me that he was programming a "Life" -simulation with "bacteria" moving in a window eating "algae" which "grow" as well in that window. The moving around consumes energy, while "eating the algae" gives back energy and if an "bacterium" has collected enough energy, it splits into two individuals.
I was very fascinated by his idea and wanted to create my own life simulation. I tried a couple of times with a couple of tools, but - being a unexperienced programmer at this time - never succeeded.
However, recently I had the wish to learn Java, as I collected some experience with C#, and wanted to switch to a more platform-independent programming language.

Output

Here is a little movie of the outcome of my attempts, the not-so fluent animation is a result of swapping due to low memory:


During development I experienced some challenges which I finally managed and which I want to share with you.

Environment

Hardware: MacBook5,1 with Intel Core 2 Duo processor and 2 GB RAM
Operating system: Mac OSX 10.7.5
IDE: Eclipse Kepler Service Release 1
UI Framework: WindowBuilder Pro (providing Swing & SWT)
JVM: 1.5 (Mac OX Default)

Challenges

Flickering

The first thing I stumbled over was the phenomenon of the "flickering" screen. This means that the animation does not run fluently, but creates occasional errors which switches the output window to white so the screen flickers. This phenomenon is a quite common one judged by the large number of discussion in the web. Finally I found a discussion which helped me. The solution of the flickering-problem involves creating a Buffer-Image which is posted to the screen instead of posting the graphics-object ("sprites") individually and a specific override-implementation of the "paint()" method.

Main Program

    public static void main(String[] args) {
        createAndShowGUI();
    }

Method createAndShowGUI()

    public static void createAndShowGUI() {
        JFrame mainFrame = new JFrame();
        mainFrame.setDefaultCloseOperation(JFrame.EXIT_ON_CLOSE);
        PixiesUI animationPanel = new PixiesUI();
        mainFrame.getContentPane().add(animationPanel);
        mainFrame.pack();
        mainFrame.setVisible(true);
        animationPanel.runAnimation();
    }

Method runAnimation() 

public void runAnimation() { [...]
  while (elapsedTime < animDuration) {
  //Create algae
  //Move Bacteriae
  try {
    Thread.sleep(30);
  }
  catch (Exception e) {
  }
  paint(this.getGraphics()); <-- This is important! pass the Graphics object of panel to paint()
  }
}

Override Method paint(Graphics g)

    @Override
    public void paint(Graphics g) {
 
      Dimension theDim = getSize();
      BufferedImage theBuffImg = new BufferedImage(5, 5, BufferedImage.TYPE_INT_RGB); <-- Bufferimage for fluent animation
      theBuffImg = (BufferedImage) createImage(theDim.width,theDim.height);
      Graphics2D theBuffImgGraphics = theBuffImg.createGraphics();
      theBuffImgGraphics.setPaint(Color.BLACK);
      Rectangle rect = new Rectangle(0, 0, theDim.width,theDim.height);
      theBuffImgGraphics.fill(rect);
      [... do more paint stuff here ...]
        g.drawImage(theBuffImg, 0, 0, this); <-- Finally paint image on JPanel
    }

 Object Housekeeping with ArrayLists

Another (common) problem is to savely add or remove objects from arrays holding all the objects in the application during loops. In essence there a two approaches, one involving the original list and a buffer list, another involving the use of an iterator.

Buffer List Approach

Here I created entries in a buffer list by loop in over the original list using an iterator. The removal of objects of the original list is driven by the buffer list (I call the "algae" "Pixie" ;)):
         ArrayList<CPixie> pixieList;
         ArrayList<CPixie> pixieBuffer;
         Iterator<CPixie> pixieIterator = pixieList.iterator();
         while (pixieIterator.hasNext()){
         CPixie thePixie = pixieIterator.next();
            if (thePixie.getEnergy() > 1500){
            CPixie newPixie = new CPixie(thePixie.getXPos() + 5, thePixie.getYPos() + 5);
            pixieBuffer.add(newPixie);
            thePixie.reduceEnergy(900);
            }
            }
 
            for (CPixie newPixie : pixieBuffer){
            addNewPixie(newPixie.getXPos(),newPixie.getYPos());
         }

Iterator Approach

ArrayList<CFood> foodItems; 
Iterator<CFood> foodIterator = foodItems.iterator();
while(foodIterator.hasNext()){
CFood foodItem = foodIterator.next();
if (foodItem.getEaten()) foodIterator.remove();
}

I hope that helps with you own project. To be complete I post the complete code of my project below.

All Code

Class PixieUI


import java.awt.Color;
import java.awt.Dimension;
import java.awt.Graphics;
import java.awt.Graphics2D;
import java.awt.Rectangle;
import java.awt.image.BufferedImage;

import javax.swing.JFrame;
import javax.swing.JPanel;

public class PixiesUI extends JPanel {
private static final long serialVersionUID = 1L;
//int ovalX = 50;
    long animDuration = 5000;
    long currentTime = System.nanoTime() / 1000000;
    long startTime = currentTime;
    long elapsedTime = currentTime - startTime;
    private CFoodList _foodItems;
    private CPixieList _pixieList;

    public PixiesUI() {
        setPreferredSize(new Dimension(500, 500));
        setDoubleBuffered(true);
    }

    public void runAnimation() {
    _foodItems = new CFoodList();
    _pixieList = new CPixieList();
    CPixieList _newPixieBuffer = new CPixieList();
    //Create the first Pixie
    Dimension theDim = getSize();
    _pixieList.addNewPixie(theDim.width / 2,theDim.height / 2);
        while (elapsedTime < animDuration) {
        //Remove all items from last pass
        _newPixieBuffer.pixieList.clear();
            elapsedTime = currentTime - startTime;
            //create new random food
    theDim = getSize();
            _foodItems.addNewFood(theDim.width,theDim.height);
            _foodItems.addNewFood(theDim.width,theDim.height);
            _foodItems.addNewFood(theDim.width,theDim.height);
           
            _pixieList.movePixies(theDim.width, theDim.height);
           
            try {
                Thread.sleep(30);
            }
            catch (Exception e) {
            }
           
            paint(this.getGraphics());
        }
    }

    @Override
    public void paint(Graphics g) {
   
    Dimension theDim = getSize();
    BufferedImage theBuffImg = new BufferedImage(5, 5, BufferedImage.TYPE_INT_RGB);
    theBuffImg = (BufferedImage) createImage(theDim.width,theDim.height);
    Graphics2D theBuffImgGraphics = theBuffImg.createGraphics();
    theBuffImgGraphics.setPaint(Color.BLACK);
    Rectangle rect = new Rectangle(0, 0, theDim.width,theDim.height);
    theBuffImgGraphics.fill(rect);
           
        for (CPixie thePixie : _pixieList.pixieList){
        for (CFood foodItem : _foodItems.foodItems){
        if (foodItem.getFoodSprite().contains(thePixie.getXPos(),thePixie.getYPos())){
        thePixie.feedPixie();
        _foodItems.foodItems.remove(foodItem);
        break;
        }
        }
       
        theBuffImgGraphics.setPaint(Color.RED);
        theBuffImgGraphics.fill(thePixie.getPixieSprite());
        }
       
        for (CFood theFoodItem : _foodItems.foodItems){
        theBuffImgGraphics.setPaint(Color.GREEN);
        theBuffImgGraphics.fill(theFoodItem.getFoodSprite());
        }
       
        theBuffImgGraphics.setPaint(Color.BLACK);
        rect = new Rectangle(8, 8, 50, 16);
        theBuffImgGraphics.fill(rect);
       
        theBuffImgGraphics.setPaint(Color.BLACK);
        rect = new Rectangle(60, 8, 50, 16);
        theBuffImgGraphics.fill(rect);
       
        theBuffImgGraphics.setPaint(Color.GREEN);
        int foodNumber = _foodItems.foodItems.size();
        String foodNumberStr = String.valueOf(foodNumber);
        theBuffImgGraphics.drawString(foodNumberStr,10,23);
       
        theBuffImgGraphics.setPaint(Color.RED);
        int pixieNumber = _pixieList.pixieList.size();
        String pixieNumberStr = String.valueOf(pixieNumber);
        theBuffImgGraphics.drawString(pixieNumberStr,62,23);
       
        g.drawImage(theBuffImg, 0, 0, this);
    }

    public static void main(String[] args) {
        createAndShowGUI();
    }

    public static void createAndShowGUI() {
        JFrame mainFrame = new JFrame();
        mainFrame.setDefaultCloseOperation(JFrame.EXIT_ON_CLOSE);
        PixiesUI animationPanel = new PixiesUI();
        mainFrame.getContentPane().add(animationPanel);
        mainFrame.pack();
        mainFrame.setVisible(true);
        //I made the call to runAnimation here now
        //after the containing frame is visible.
        animationPanel.runAnimation();
    }
}

Class CFood


import java.util.Random;
import java.awt.geom.*;

public class CFood {
protected int _xPos;
protected int _yPos;
protected int _radius = 7;
protected boolean _eaten = false;
protected Ellipse2D.Double _foodSprite;
//Constructor *******************************
public CFood(int winXSize, int winYSize)
{
//Set Position of food
setXPos(winXSize);
setYPos(winYSize);
setFoodSprite();
}
private void setFoodSprite(){
_foodSprite = new Ellipse2D.Double(getXPos(),getYPos(),getRadius(),getRadius());
}
public Ellipse2D.Double getFoodSprite(){
return _foodSprite;
}
private void setXPos(int winXSize)
{ 
Random seedGen = new Random();
Random theRandomGenerator = new Random(seedGen.nextInt(1234567));
_xPos = theRandomGenerator.nextInt( winXSize );
}
private void setYPos(int winYSize)
{ 
Random seedGen = new Random();
Random theRandomGenerator = new Random(seedGen.nextInt(1234567));
_yPos = theRandomGenerator.nextInt( winYSize );
}
public void setEaten(){
_eaten = true;
}
public boolean getEaten(){
return _eaten;
}
//*******************************************
//Position Getters **************************
public int getXPos()
{
return _xPos;
}
public int getYPos()
{
return _yPos;
}
public int getRadius()
{
return _radius;
}
//*******************************************
}

Class CFoodList


import java.util.ArrayList;
import java.util.Iterator;

public class CFoodList {

ArrayList<CFood> foodItems;
public CFoodList()
{
super();
foodItems = new ArrayList<CFood>();
}
public void addNewFood(int winXSize, int winYSize)
{
CFood foodItem = new CFood(winXSize, winYSize);
foodItems.add(foodItem);
}
public void removeEatenFoodItems(){
Iterator<CFood> foodIterator = foodItems.iterator();
while(foodIterator.hasNext()){
CFood foodItem = foodIterator.next();
if (foodItem.getEaten()) foodIterator.remove();
}
}
public void removeEatenFoodItem(CFood eatenFoodItem){
foodItems.remove(eatenFoodItem);
}
}

Class CPixie


import java.util.Random;
import java.lang.Math;
import java.awt.geom.*;


public class CPixie {
protected int _xPos;
protected int _yPos;
protected int _Energy;
protected int _radius = 7;
protected int _stepWidth;
protected Ellipse2D.Double _pixieSprite;

public CPixie(int xPos, int yPos) {
setXPos(xPos);
setYPos(yPos);
setEnergy(1000);
setPixieSprite();
Random ranGen = new Random();
_stepWidth = 1 + ranGen.nextInt(10);
}
private void setPixieSprite(){
_pixieSprite = new Ellipse2D.Double(getXPos(),getYPos(),getRadius(),getRadius());
}
public Ellipse2D.Double getPixieSprite(){
return _pixieSprite;
}
private void setXPos(int xPos){
_xPos = xPos;
}
private void setYPos(int yPos){
_yPos = yPos;
}
private void setEnergy(int theEnergy){
_Energy = theEnergy;
}
public int getEnergy(){
return _Energy;
}
public int getXPos(){
return _xPos;
}
public int getYPos(){
return _yPos;
}
public int getRadius(){
return _radius;
}
public void movePixie(int winWidth, int winHeight){
Random theRandomGen = new Random();
int xStep = theRandomGen.nextInt(_stepWidth) * (int) Math.pow(-1.0,(double)theRandomGen.nextInt(2));
if (!checkHorizInsidePanel(xStep,winWidth)) xStep = xStep * -1;
setXPos(getXPos() + xStep);
int yStep = theRandomGen.nextInt(_stepWidth) * (int) Math.pow(-1.0,(double)theRandomGen.nextInt(2));
if (!checkVerticalInsidePanel(yStep,winHeight)) yStep = yStep * -1;
setYPos(getYPos() + yStep);
setPixieSprite();
reduceEnergy();
}
public void feedPixie(){
setEnergy(getEnergy() + 450);
}
private boolean checkHorizInsidePanel(int xStep, int winWidth){
boolean insidePanel = false;
if (winWidth > getXPos() + xStep && getXPos() + xStep > 0) insidePanel = true;
return insidePanel;
}
private boolean checkVerticalInsidePanel(int yStep, int winHeight){
boolean insidePanel = false;
if (winHeight > getYPos() + yStep && getYPos() + yStep > 0) insidePanel = true;
return insidePanel;
}
public void reduceEnergy(int amount){
setEnergy(getEnergy() - amount);
}
private void reduceEnergy(){
setEnergy(getEnergy() - _stepWidth);
}
}

Class CPixieList


import java.util.ArrayList;
import java.util.Iterator;

public class CPixieList {
ArrayList<CPixie> pixieList;
ArrayList<CPixie> pixieBuffer;
public CPixieList()
{
super();
pixieList = new ArrayList<CPixie>();
pixieBuffer = new ArrayList<CPixie>();
}
public void movePixies(int winWidth, int winHeight){
pixieBuffer.clear();
        if (pixieList.size() > 0){
            for(CPixie thePixie : pixieList){
            thePixie.movePixie(winWidth, winHeight);
            }
        }
        
        //Clean Pixie list from dead pixies
        removeDeadPixies();
        
        //Create new Pixies if energy is high enough
        if (pixieList.size() > 0){
            //for(CPixie thePixie : _pixieList.pixieList){
        Iterator<CPixie> pixieIterator = pixieList.iterator();
        while (pixieIterator.hasNext()){
        CPixie thePixie = pixieIterator.next();
            if (thePixie.getEnergy() > 1500){
            CPixie newPixie = new CPixie(thePixie.getXPos() + 5, thePixie.getYPos() + 5);
            pixieBuffer.add(newPixie);
            thePixie.reduceEnergy(900);
            }
            }
            for (CPixie newPixie : pixieBuffer){
            addNewPixie(newPixie.getXPos(),newPixie.getYPos());
            }
        }
}
public void giveBirthToPixie(int xStartPos, int yStartPos, CPixie thePixie){
addNewPixie(xStartPos, yStartPos);
thePixie.reduceEnergy(900);
}
public void addNewPixie(int xStartPos, int yStartPos)
{
CPixie thePixie = new CPixie(xStartPos, yStartPos);
pixieList.add(thePixie);
}
public void removeDeadPixies(){
Iterator<CPixie> theIterator = pixieList.iterator();
ArrayList<CPixie> bufferList = new ArrayList<CPixie>();
while (theIterator.hasNext()){
CPixie thePixie = theIterator.next();
if (thePixie.getEnergy() <= 0){
theIterator.remove();
bufferList.add(thePixie);
}
}
for (CPixie deadPixie : bufferList){
pixieList.remove(deadPixie);
}
}
}

Monday, September 23, 2013

SQL - Calling Stored Procedure with Comma Separated List in Input Parameter

Background

Currently I am programming on an ASP.NET web application with a data connection to a MS SQL Server 2008 R2 database. I am fetching data always via stored procedures. Today I came across the problem that I wanted to program a procedure where I have to do a SELECT with a WHERE column IN (...) with an unknown number of arguments in the IN statement.
Hence I was looking for a way to transfer a comma separated list as string parameter into the WHERE IN argument.

First Try

The straight forward approach I tried looked like this:

CREATE PROCEDURE [dbo].[MyProcedure]
@inputList nvarchar(MAX) <- comma separated list of values (string)
AS
BEGIN
      SELECT * FROM myTable
      WHERE
      colName IN (@idList)
END
GO

Unfortunately, this approach does not work. You can inject a list with on list element which will return some reasonable result, but as soon as you call this with list with more than one argument, this fails, as the argument is not interpreted as WHERE IN ('arg1','arg2') but as WHERE IN ('arg1,arg2').

Solution

After some research I stumbled over a Code Project thread which was the key to solve the problem. To have a more ready-to-use description I wrote this blog. With the help of the above thread I wrote the following stored procedure:

CREATE PROCEDURE [dbo].[myWorkingProcedure]
@inputList nvarchar(MAX)
AS
DECLARE @SEPERATOR as VARCHAR(1)
DECLARE @SetPoint INT
DECLARE @VALUE nvarchar(50)
CREATE TABLE #tempTab (id nvarchar(50) not null)
BEGIN
SET NOCOUNT ON;
WHILE PATINDEX('%,%',@idList) > 0 <-- Drive loop while commata exist in the input string
BEGIN
SELECT  @SP = PATINDEX('%,%',@idList) <-- Determine position of next comma
SELECT  @VALUE = LEFT(@idList , @SP - 1) <-- copy everything from the left into buffer
SELECT  @idList = STUFF(@idList, 1, @SP, '') <-- throw away the stuff you copied
INSERT INTO #tempTab (id) VALUES (@VALUE) <-- put value in buffer table
END
INSERT INTO #tempTab (id) VALUES (@idList) <-- insert last value in the input list to buffer
BEGIN
SELECT * FROM myTable
WHERE
myColumn IN (SELECT id FROM #tempTab) <-- Do the select
DROP TABLE #tempTab <-- throw buffer table away
END
END
GO

Conclusion

With the help of the above code it is possible to perform dynamic SELECT WHERE IN statements with an unknown number of arguments. I hope this post helps you to overcome your own problems with transactional SQL


all the best
WolfiG

Sunday, September 1, 2013

Prinzessinnen-Bett im Selbstbau mit Bauplan

Liebe Leser,

unsere Töchter entwachsen langsam ihren Babybettchen / Gitterbettchen. Vor allem die Große ist inzwischen mit 3 1/2 Jahren und 104 cm so groß, dass sie in mittelfristiger Zeit ein neues Bett braucht. Sie träumt von einem Prinzessinnenbett, natürlich am liebsten als Hochbett. Die Kleine ist 20 Monate alt, insofern kommt für sie im Moment kein Hochbett in Frage.
Weiterhin möchten wir die beiden Kinder für die nächsten Jahre in einem gemeinsamen Schlafzimmer unterbringen. Wir können also momentan kein Hochbett für die Große anschaffen, da beide Kinder im gleichen Zimmer herumtollen werden. Was wir aber gerne hätten, wäre ein Bett, das "mitwächst", also das sich umbauen lässt. Da Bett sollte für unsere Große als Prinzessinnen-Bett ("normal") begonnen werden und dann so aufgebaut sein, dass es durch Module erweiterbar ist, idealerweise in ein paar Jahren zum Hochbett.
Weitere Anforderungen / Spezifikationen des zu bauenden Betts:

  • Standardmaß für Lattenrost und Matratze (90 x 200 cm)
  • Unter dem Bett sollten große Schubladen Platz haben um Bettwäsche dort unterzubringen
  • Kompatibilität mit den Maßen eines Bettes von einem beliebten Kinderbettherstellers (L x B: 201,4 x 97,9) um das Zubehör dazu nutzen zu können. Ich habe allerdings eine größere Höhe gewählt, als das Bett von P.... um mehr Platz für einen großen Bettkasten zu schaffen.
Für die Erstellung der technischen Zeichnungen verwende ich LibreCAD, CorelCAD 2014 und für die der 3D-Darstellungen Blender

Der "Standard"-Rahmen

Um ein Bettsystem modular aufzubauen, brauchen wir einen Rahmen, der einen "Standard" darstellt, und auf Basis dessen das Bettsystem aufgebaut wird. Wie oben beschrieben, möchte ich den Rahmen auf Standard-Lattenrost- und Matratzenmaßen aufbauen. Ich habe im Moment die folgenden, im Internet erhältlichen Produkte als Arbeitshypothese ausgewählt:
  • Lattenrost "Sirius" von Breckle, erhältlich bei Home24, eine Alternative ist ein Lattenrost von IKEA 
  • passende Matratze ebenfalls bei Home24

Bettgestell im Eigenbau

Als Ausgangsmaterial habe ich im Baumarkt erhältliche Vierkant-Hölzer aus Kiefer (54 x 54 mm) verwendet. Es hat sich allerdings aber beim Bau herausgestellt, dass ein anderes Holz besser gewesen wäre, ich denke, Buche vom Schreiner wäre besser gewesen. Hier die Materialliste:

  • 7 Vierkant-Hölzer 54 x 54 mm x 3 m
  • 2 Vierkanthölzer 20 x 20 mm x 2m
  • 3 Vierkanthölzer 10 x 10 mm x 2 m
  • 2 Spanplatten 90 x 45 x 8 mm
  • Holzleim
  • 4 x Möbelverbinder mit Schrauben der Länge 80 mm
  • Rundholz, Durchmesser 25 mm, Länge 1 m
  • Riffelstange, Durchmesser 12 mm, Länge 1 m

Das Material hat ungefähr 120.- € gekostet.
Weiterhin standen mit als Werkzeug folgendes zur Verfügung:

  • Stichsäge
  • Bohrmaschine
  • Bohrer der Durchmesser 6, 7, 12, 25 mm
  • Schraubzwingen
  • Exzenterschleifer
Zusammengebaut sieht mein Gestell so aus:


Das ganze nochmal als Explosionszeichnung:

Im Original sieht das ganze zusammengebaut so aus:


Verbindung der Einzelteile

Mein Ziel beim Bettbau war es, die Teile so wenig wie möglich zu verschrauben, und gleichzeitig eine größtmögliche Stabilität zu erreichen. Da ich keine Oberfräse zum anfertigen von Schwalbenschwänzen habe (und auch ein zu unruhiges Händchen um das mit der Säge zu machen), entschied ich mich dazu, die Rahmenhölzer mittels "geradem Eckblatt" zu verbinden. Die beiden Hölzer werden dabei verklebt und zusätzlich durch einen durchgebohrten 12 mm Holzdübel (aus Riffelholz) verbunden.
Die Rahmenteile sehen im Original so aus:

Um die Längsschenkel zu befestigen, wollte ich es vermeiden, die Teile zu verkleben, um das Bett gut wieder verlegen zu können. Dazu habe ich eine Verzapfung mittels 25 mm Rundhölzern gewählt. Um die den Lattenrost tragenden Schenkel zu befestigen, sichere ich die verzapften Teile noch mit Möbelverbindern, für die die Rundhölzer mit einem 6-7 mm Loch entlang der Zapfen-Längsachse versehen werden.

Mai 2014 Update: So Sieht's aus

So, jetzt ist mein Werk bis auf einen zweiten Anstrich fertig. Ich habe noch eine Baldachin-Konstruktion auf Kanthölzern 54x54mm dazugebaut, damit ein Baladachin von PAIDI über dem Bett angebracht werden kann. In diesem Stadium bin ich ganz zufrieden:

Einmal ohne Baldachin, um die Unterkonstruktion zu zeigen


Einmal mit Baldachin und Bettzeug

Friday, August 30, 2013

Configuring ASP.NET Application, IIS and Infrastructure to Utilize Username in Application

Hi folks, here is again an article about a thing from the miraculous world of web software development that drives me crazy.

Background

Currently I am writing a database ASP.NET application to be used within our company's intranet. I want to restrict the data from the database accessible by my users, so I need the user name to perform user-specific selects on the database. In Visual Studio debugging mode, everything works works fine: the user name is available by using the variable:
System.Security.Principal.WindowsIdentity.GetCurrent().Name
Unfortunately, the situation changed as soon as I deployed my application on my IIS 7.5 web server. There nothing was available in the first place.
Further environment characteristics:

  • OS (development & webserver): Windows 7 Enterprise
  • IDE: Visual Studio Express for Web Development 2012
  • IIS: 7.5 installed on my development machine (local admin required)
  • Database: SQL Server 2008 R2 (not important here, but for completeness)

Starting Point

As described in the Introduction, I started having a working application, which even worked in the sense of providing a user name in debugging mode. The minimal web.config provided as standard by Visual Studio looks like this:
<?xml version="1.0" encoding="utf-8"?>

<configuration>
    <system.web>
      <compilation debug="true" targetFramework="4.5" />
      <httpRuntime targetFramework="4.5" />
    </system.web>
</configuration>

Note: this simple configuration is only provided if you choose the "Empty ASP.NET Web Application". It can as well be more complex. However, running this simple application from within Visual Studio in debugging mode produces the following output:


Deploying on my IIS and running the same thing resulted in this (note: the greyed out area is the URL to the PC, the IIS is running on):


This is where I began searching the web for possible solutions for my problem. One source I found very promising was the following forum thread where the solution to the initial post seemed to fit my needs quite well:
How to get Windows user name when identity impersonate=“true” in asp.net?

Setting Up Web.Config and IIS

According to the stackoverflow-thread above, the problem can be cured by adjusting the web.config file of my development project and by adjusting the settings in IIS.
Following the advices of stackoverflow, I added a line <authentication mode="Windows"> to my web config, which looked like this:
<?xml version="1.0" encoding="utf-8"?>

<configuration>
    <system.web>
      <compilation debug="true" targetFramework="4.5" />
      <httpRuntime targetFramework="4.5" />
      <authentication mode="Windows" />
    </system.web>
</configuration>
If you do this, please do not forget to re-publish your site to IIS.
To change the IIS properties, first launch IIS (internet information services) in admin mode. Select your site you want to adjust (in my case TestApp) and double click on the "Authentication" Button. In a screenshot this looks like this (please forgive my German speaking screen ;)):


In the "Authentication" section, switch of everything but Windows-authentication:


Then I re-started my application and ... ran into the next problem. Now a login popup window asked me to provide a user and a password. I tried my normal MyDomain\MyUser and normal password without success. I guess I had to create dedicated user on my local PC, which I didn't want as I didn't want to put the login burdon on my users.

Login Popup Problem

As described above, now I had this s***ty lobin popup coming up again and again and it took me about 2 days to find a solution to this. Before I come to this, I'd like to tell what I checked:
  • WebMatrix.*.dll in BIN diectory of my app according to a stackoverflow thread. This was actually a nobrainer as my app was not based on MVC3.
  • Combinations of impersonation in IIS and in web.config, like in this thread
  • I checked all the settings about security zones (added my site to trusted sites) and authentication settings in IE advanced options
  • Some more stuff I don't remember. Nothing worked...
The breakthrough came through an msdn blog: "Things to check when Kerberos authentication fails using IIS/IE…". Somewhere in the lower part, they mention "Are the client and server on the same box?" and guess what - I tested all the time on my local machine where as well my webserver sits. So finally I switched to another machine - configuration of web.config and IIS as described in the previous chapters - and the thing worked. Actually one thing I had to do was to delete my application completely from the server and re-publish it again and afterwards it worked.
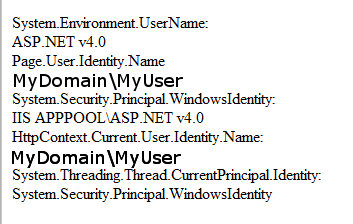
My test application yields the following result:

Conclusion: The required user information is available via:

  • Page.User.Identity.Name
  • HttpContext.Current.User.Identity.Name

Test Application

To have a handy look at the variables, I programmed a little test application with output for the parameters interesting for me. This Application has one screen:

<%@ Page Language="C#" AutoEventWireup="true" CodeBehind="Default.aspx.cs" Inherits="TestApp.WebForm1" %>

<!DOCTYPE html>

<html xmlns="http://www.w3.org/1999/xhtml">
<head runat="server">
<meta http-equiv="Content-Type" content="text/html; charset=utf-8"/>
    <title></title>
</head>
<body>
    <form id="form1" runat="server">
    <div>
        System.Environment.UserName:<br />
        <asp:Label ID="Label_Environment" runat="server" Text="Label" Width="300px"></asp:Label>
        <br />
        Page.User.Identity.Name<br />
        <asp:Label ID="Label_PageIdentity" runat="server" Text="Label" Width="300px"></asp:Label>
        <br />
        System.Security.Principal.WindowsIdentity:<br />
        <asp:Label ID="Label_Principal" runat="server" Text="Label" Width="300px"></asp:Label>    
        <br />
        HttpContext.Current.User.Identity.Name:<br />
        <asp:Label ID="Label_HttpContext" runat="server" Text="Label" Width="300px"></asp:Label>  
        <br />
        System.Threading.Thread.CurrentPrincipal.Identity:<br />
        <asp:Label ID="Label_Threading" runat="server" Text="Label" Width="300px"></asp:Label> 
    </div>
    </form>
</body>
</html>

The three Label_* fields are filled in the Page_Load method:
protected void Page_Load(object sender, EventArgs e)
{
    Label_Environment.Text =     System.Environment.UserName.ToString();
    Label_PageIdentity.Text = Page.User.Identity.Name;
    Label_Principal.Text =       System.Security.Principal.WindowsIdentity.GetCurrent().Name.ToString();
    Label_HttpContext.Text = HttpContext.Current.User.Identity.Name;
    Label_Threading.Text = System.Threading.Thread.CurrentPrincipal.Identity.ToString();
}

That was it, I hope you can get something out of my findings
Cheers
W 

Wednesday, August 28, 2013

ASP.NET - Mapping of Date Information from DB to UI

Background

I'm currently working on a database-based ASP.NET application where I have 3 date fields on the screen. I use TextBox controls for the Date fields and the column format in the database is "date". 
Saving to and reading from the database was no problem as long as the input type of the TextBox was datettime, but I ran into a major issue when I wanted to have the TextBox of input type "date" - the code could be compiled but when executing, the program crashed.

Wrong Turn

My first attempt to map from the TextBox to the database looked something like this:


DataTable DB_Table = new DataTable //I'm doing everything in the code with DataTables reflecting the input parameters of stored procedures
[... create table structure, etc. ...] 
DB_Table["DateColumn"] = TextBox_Date.Text // This worked fine as long as this was single line or datetime
[... update table in DB ...] 

Solution

After a bit of searching the web and try and error I came up with the following solution, which works, but which still has the disadvantge of hard coded date format. I believe, someone more clever then me could do this in a more generic way:

Mapping DB date format to TextBox date format

As one can see, the mapper inputs and outputs strings, which have to have the right format. As I am living in Germany, I chose the date format to be dd.MM.yyyy:
private String convertDBDateToTextBoxDate(String inputDateString) 
{    
    String outputDateString;
    String inputFormat = "dd.MM.yyyy HH:mm:ss";
    String outputFormat = "{0:dd.MM.yyyy}";
    DateTime closedDate = 
             DateTime.ParseExact(inputDateString,
                                inputFormat, CultureInfo.InvariantCulture);
                              // This line is actually the main point!!!
    outputDateString =
                                String.Format(outputFormat, closedDate);
    return outputDateString;
}

Mapping TextBox date format to DB date format

The approach above can be used as well vice versa:
private String convertTextBoxDateToDBDate(String inputDateString)
{
    String outputDateString;
    String outputFormat = "{0:dd.MM.yyyy HH:mm:ss}";
    String inputFormat = "dd.MM.yyyy";
    DateTime closedDate =
                                DateTime.ParseExact(inputDateString,
                               inputFormat, CultureInfo.InvariantCulture);
    outputDateString = String.Format(outputFormat,
                                closedDate);
    return outputDateString;
}

Surrrounding Code - Procedures to Update DB

First the code to map screen values to DB:
private DataRow updateValuesFromScreen(DataRow ActionItem)
{
     if (TB_Date.Text != "") {
          theDataRow["MeetingDate"] =
                                        convertTextBoxDateToDBDate(TB_Date.Text);
           }
    [... code filling all the other fields ...]
    return theDataRow;
}
Then the code of the ButtonSave_Click event:
protected void ButtonSave_Click(object sender, EventArgs e)
{
    DataRow theDataRow;
    classDataHandler theDataHandler =
                                            new classDataHandler();
                                           // The data handler is a class where I do the processing of data from / to DB
    theDataRow =
                        theDataHandler.getSingleRow(<keyValuesInDB>);
                       // This is required, because theDataRow is not filled due to the REST paradigm.
    theDataRow = updateValuesFromScreen(theDataRow);   
          theDataHandler.updateActionItem(theDataRow);
}

Surrrounding Code - Procedures to Update UI

The method getActionItem() updates the screen-fields by 1) fetching data from DB and 2) calling the conversion method convertDBDateToTextBoxDate (see above)
private void getActionItems()
{
       classDataHandler theDataHandler =
                                           new classDataHandler();
       tableWithRows =
                                          theDataHandler.getRows(<db keys>);
       [... some more code ...]     
       setScreenTexts(tableWithRows);
}

private void setScreenTexts(DataTable theDataTable)
{
       DataRow theDataRow =
                              theDataTable.Rows[<index>];
       if (theDataRow["MyDate"].ToString() != "")
       {
             TB_Date.Text = 
convertDBDateToTextBoxDate(theDataRow["MyDate"].ToString());
        }
        else { TB_Date.Text = ""; }
        [... other code ...]
             }

I hope this helps.

Cheers
W

Friday, August 9, 2013

CITRIX Online Plug-In: Fixing the Error 2320 (AllowHotkey)

Background

This article refers to a CITRIX client running on a windows 7 machine. The corresponding CITRIX online plug-in has the version 12.0.3.8. You can check this by launching the system control --> software

One note: if this blog post helps resolving your problem, it would be nice if you clicked on the ads banner to the right or at the bottom. Does not cost you anything and gives me some cents of revenue ;)

Process

Start the local CITRIX online plug-in on your PC:
Start --> CITRIX --> Online Plug-In

Then start a CITRIX client session
In the taks bar --> left-click on online plug-in and the requested client configuration

Result
You will get an error:


Error numer 2320: "No value could be found for (Allowhotkey) that satisfies all lockdown requeriments"

Fixing this Error

1) Open the registry: start --> search for regedit.exe
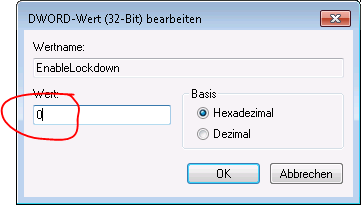
2) In the registry path HKEY_CURRENT_USER\Software\Citrix\ICA Client\Lockdown Profiles\All Regions:
Double click on the registry key "EnableLockdown":


And change the value from 1 to 0:


3) You need to stop and restart the online plug-in to make changes to take effect.

I hope that helps, cheers W

Tuesday, June 18, 2013

How to Set Up MS SQL Server and IIS 7.5 for ASP.NET 4.5 Application


Background

I am currently developing an ASP.NET 4.5 application with connection to a database on MS SQL Server 2008 R2. I am using some dropdown-box controls on one screen which I configured to connect directly to the DB. To run the application in our company's intranet I deployed it on my local Windows 7 Professional PC, where I was running IIS 7.5 as web server. As development environment I was using MS Visual Studio Express 2012 for Web.
Everything worked fine as long as I was developing in Visual Studio, where I was able to start the application on Chrome and localhost without problems. The trouble started when I deployed my web application to IIS. In principle it worked, I was able to run the application through port 80 after I opened the corresponding port in the fire wall. However, the system crashed as soon I was calling a screen with dropdown-boxes connected to the SQL Server.
The error I got on the dump-screen was the following:
"Server error in application /MyApplication"
"Login Failed for user 'MyDomainName\MyPCName$'"
[...]
"[SQLException (0x80131904): Login failed for user 'MyDomainName\MyPCName$' ....


Attempts

I started to read loads of articles and tried the following things:
  • Introduction of a dedicated user for the login on the SQL Server together with Windows-Authentication didn't work - and why should it?
  • Switching from Windows Authentication to SQL Server Authentication: I convinced our SQL Server admin to switch the Authentication mode from Windows to SQL Server & Windows. However, this was a non-option in the end as I was not the owner of the server and a re-start of the server was prohibited.
  • IIS impersonation: didn't work as this requires SQL Server Authentication (see above)

Solution

In the end I became curious about the fact that the error message which stated something about 'MyDomainName\MyComputerName$'. I created in SQL Server a user 'MyDomainName\MyComputerName' using Windows Authentication mode. This caused the following error message


Create failed for Login 'MyDomainName\MyPCName' [...] Server, Error: 15401
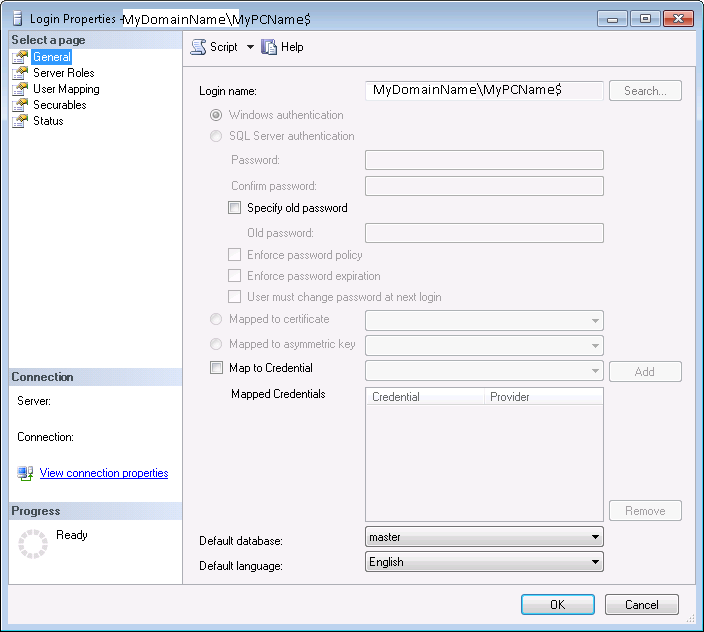
Finally, I found that typing 'MyDomainName\MyPCName$' worked. Furthermore you have to set the following settings:

  • The General Settings look like this:

  • In the database you want to use create a user with the same name MyDomainName\MyPCName$

  • In the Section "User Mapping" of the Login Properties (Section SQL Server Instance --> Security --> Login Properties make the following settings

I hope this article helped you. If not, please send me comments to improve it.

Reference: "Login failed for user <user>"; http://msdn.microsoft.com/en-us/library/ab4e6cky(v=vs.80).aspx