Showing posts with label NAS. Show all posts

Sunday, September 23, 2012

Connecting a DS212j NAS Directly to a Computer Without Using a Router

Background

I had the problem that I wanted to transfer about 100 GB of video files from my old Windows XP PC to my new Synology DS212j NAS (Networked Attached Storage). The network environment consisted of the DS as NAS, connected via cable to an airplay express wlan router (connected to a cable modem) and the PC connected via wlan to the network. One complication concerning this set-up was that the PC is quite far away from the airport express, resulting in a quite low bandwidth resulting in transfer times for the data of several ten hours.
My goal was to connect the Disk Station directly via cable to the ethernet port of the PC to benefit from the 1 GBit transfer rates of the cable connection.

One note: if you like this post, I'd be happy if you clicked on the ads banner ;)

Realization

Before you start to move your NAS to the PC direct "network", you have to note the network settings of the NAS in the standard network with the router. IN case of the Synology DS212j do the following:

1. Open the DSM - Disk Station Management Console. This can either be done by using the Synology "Assistant" program (needs to be downloaded from the Synology website) or you can open the DSM by typing <ip address of your DS>:5000.  
2. In DSM start the Control Panel and click in section "System" on "Network":


3. In the network settings go to the tab "Network Interface":


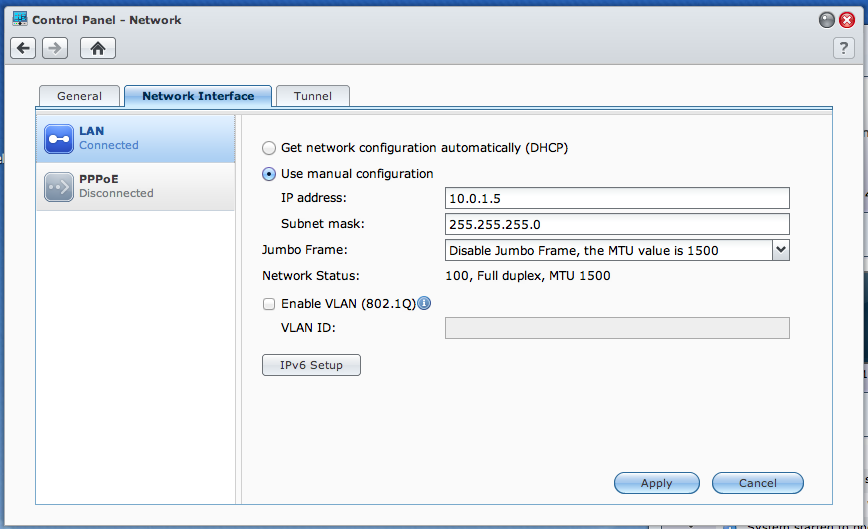
Make sure that your network configuration is set to manual. If not done already, choose an appropriate IP address for your DS together with a subnet mask that fits to your wlan router setup. Note the IP address, you will need it to do the proper configuration of the network settings of your PC as soon as the NAS is connected directly to it. Save this configuration. and shut down the NAS.

You have to connect the DS212j - and any NAS having an ethernet port - directly to the PC by using a crossed (this is important) ethernet cable not a standard one. After having realized the hardware set-up (PC + NAS) you have to play a bit with the network settings of the PC.
In the windows control panel start the network setting tool. Quite likely, the network settings of your PC are set to wlan. Disable the wireless connection - and don't forget to switch it on again if you are done with your work ;). Now go to the network settings of the ethernet LAN and there configure the TCP/IP settings. Similar to the NAS set the network address configuration to "manual". Now you have to choose an ip address for your computer which is differing only in the last number from those of the NAS (in my example I choose 10.0.1.1) and choose an appropriate subnet mask (255.255.0.0 worked for me). Save your changes.
You can check if your changes work by using the ping command. To use it open a console in Windows (programs --> run --> type in "cmd"), then type in: ping <ip number of NAS> (in my example "ping 10.0.1.5). If the PC and the NAS are connected properly, the system will respond to the ping command with something like:
"64 bytes from 10.0.1.5: icmp_seq=35 ttl=64 time=3.856 ms"

Now you can open the NAS drives like any other. However, it will not be available by standard in the explorer of Windows. You have to open the drive via "programs" --> "run" and typing in the drive/path of the folder you want to open. The only problem I encountered was that the drive could not be opened by its name, but I had to use the ip of the drive. Meaning I had to type:
<ip of NAS>∕<directory> (example: "10.0.1.5∕video")

Now it was time to copy my video data and it worked like a fly.

I hope you got something out of this blog and you enjoyed.


Sunday, August 19, 2012

Death of a Time Capsule Part 1 - Recovering the Hard Disk

Yesterday, our Apple Time Capsule (1TB) died after 4 years of service a silent and unexpected death. Besides a faint flash of the status lights of the ethernet connectors, it did not give any signal of life any more - all lights dark and the disk not starting any more. This event gave rise to a couple of thoughts:

1) What caused the failure?


Unfortunately I cannot exactly tell, as I do not have the equipment at home to do test. But from the behavior of the device I would fingerpoint to the power supply, which seems to have given up. I betted on thermal problems, which would be in line with the comments given on timecapsuledead.org.

2) What hard disk is hidden inside a Time Capsule?


There are a couple of blogs about the disks Apple uses for its TCs, most musing about the 'server grade' disks supposed to be found inside. I wanted to open the TC myself to check what is inside, and furthermore I wanted to get the hard disk out as I assumed that this was not broken and could be reused, and all my family's photos, videos, music and data is on there (YES: I do have a backup, but still...).
So I followed the description given on applefritter.com, and opened the thing.
What I found - not very unexpected - was a 1 TB Western Digital Caviar Black (WD1001FALS) SATA disk:


3) Did the Disk Survive?


As I mentioned before, my hope was that the disk was still functional and I could reuse it somewhere somehow. To check the disk I opened my goog old Dell PC which has 2 SATA disks. I unconnected one of these and connected the disk from the TC to the PC's controller.
Next I fired up the computer and started the BIOS menu (you have to hit one of the F-keys, don't remember which...). The BIOS setup rountines give the possibilities to run disk checks on the disks connected - what I did. After a while (actually, the disk check takes while) the disk check told me that my TC disk was still OK and did not show any errors:


 4) What Next???


Now I could think of a replacement for our Time Capsule. After a deep thought and a couple of discussions with my wife we identified the following things we wanted to change with a new setup:

  • Separate the disk from the WLAN router to avoid collateral damage if one of the devices breaks
  • We wanted to realize a setup which allows streaming music directly from the disk without the need to have a computer running
  • Connection to our HiFi equipment
  • Price should be kind of reasonable
  • With the TC I did the data backup manually, it would be nice to get this automated in a RAID array
  • What I got from reading a couple of forums, it would be nice if the device to come had an iTunes server on board.
  • I wanted as well to connect a PS3 to the disk to view photos via the PS3
After some time studying forums and technical datasheets, we decided for the following setup:
  • The WLAN router will be realized by an Apple Airport Express. As this is able to receive streaming data via Apple Airplay, I connected it to the HiFi amplifier
  • The Time Capsule's hard disk will be reused in a Synology DS212j. I expect that this device is able to talk Airplay and that I can connect to the Airport Express. Furthermore, it has an iTunes server on board providing a local shared library. Besides this I has to slots for disks, one to be equipped with a backup disk (still to be bought) which can be set-up as RAID array. Last but not least it has many interesting features and can be connected to a PS3.
The Synology will arrive in a couple of days. I'll keep you updated in my next blog post.